

How To Repair Shower Handles
How to Fix a Leaking Bathtub Faucet
This uncomplicated DIY repair saves money and water. Learn how to fix a leaky bathtub faucet.
![]() Time
Time
A full day
![]() Complexity
Complexity
Intermediate
![]() Price
Price
$51–100
Introduction
You don't accept to put up with the slow drip from a leaky faucet, nor with the growing stain it oftentimes leaves in the tub or shower. Ready it now and you'll prevent those headaches and salvage on y'all water pecker too. The unabridged job, with special tools, may set you lot back a bit of greenbacks, but doing it yourself is a lot cheaper than hiring a plumber, and usually much cheaper and easier than fierce out the quondam faucet and installing a new one.
Worn rubber washers, seals or gaskets in the valve associates crusade most leaks. Hither we'll show y'all how to prepare a stem-type valve, which is mutual in older, 2-handle faucets (split up hot and common cold). We won't cover single-handle faucets here.
Tools Required
Materials Required
- Plumber's grease
- Stem valve repair parts
Make sure you take new parts available
The kickoff step for bathtub faucet repair is to brand sure yous have the new parts that y'all need. Y'all can fix most bathtub plumbing problems with the replacement parts available at hardware stores and home centers. A plumbing parts distributor will carry a much larger selection and may be able to special-order hard-to-find items. There are thousands of different faucet replacement parts available to fix a leaky bathtub faucet, and then bring your former parts to the store for a proper lucifer to fix a leaky bathtub faucet. If your valve is highly corroded or the cease is wearing off, replace the unabridged faucet. Save coin by doing uncomplicated plumbing repairs yourself. These plumbing fixes are completely DIY with basic tools and skills.
Project step-by-step (vi)
Step i
Disassemble the faucet: Pry off the handle insert
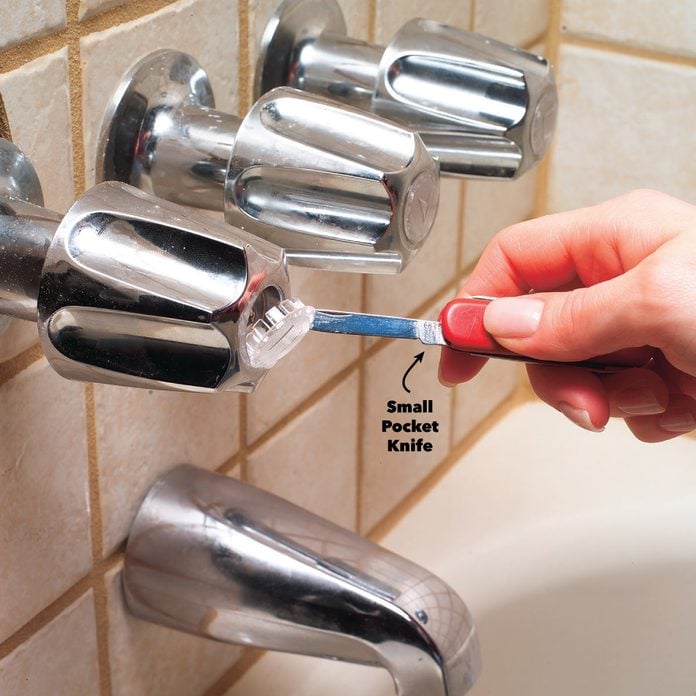
Removing the faucet handle is the toughest part of the chore. Over time, corrosion tin virtually weld the handle to the stalk. Shut off the h2o supply to the faucet and open the valves to drain excess water from the system. Pry off the handle insert with the sparse blade of a pocketknife.
Step 2
Bathtub Handle Replacement: Remove the Handle Screw
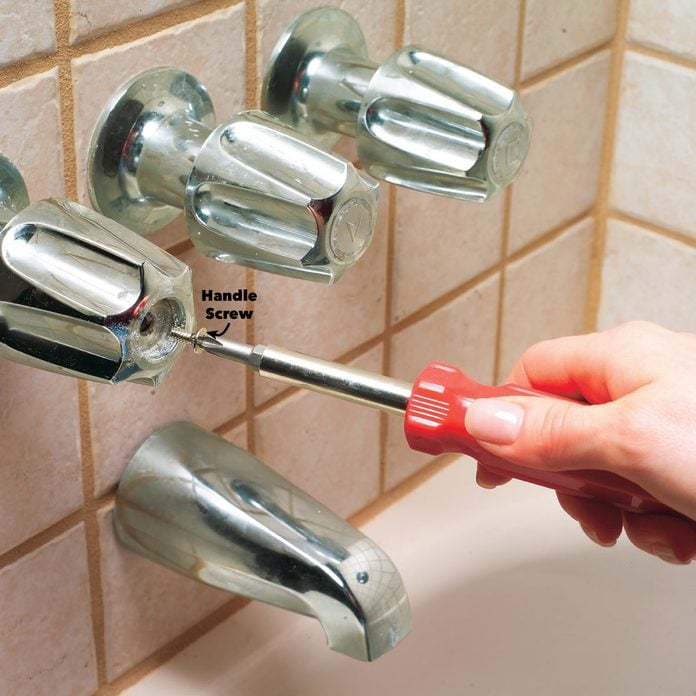
Remove the handle spiral. So wiggle the handle and pull it off. If the handle doesn't come off, oestrus it with a hair dryer to costless information technology. Be conscientious; if yous pull as well difficult, information technology'll break.
![]()
Step 3
Bathtub Handle Replacement: Popular loose the handle
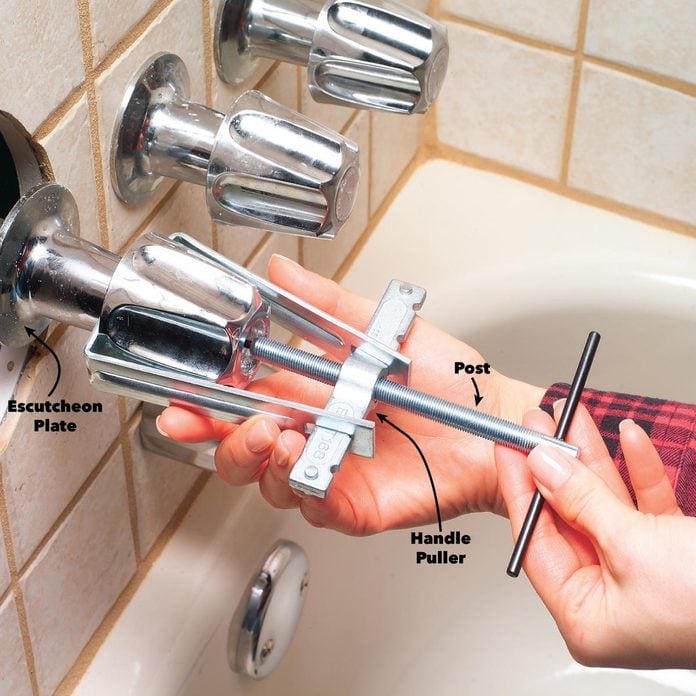
If the handle won't come off, don't force information technology-it might break. Instead, remove information technology with a special handle puller. Plough the handle spiral nearly halfway back into the stem. Position the handle puller's mail service against the screwhead and press the arms together behind the handle. Turn the mail clockwise until the handle pops loose. Remove the handle spiral and handle. Then pull off or unscrew the escutcheon plate.
Step 4
Bathtub Handle Replacement: Remove the stem

Once the handles off, unscrew the escutcheon and stem assembly (See Effigy A below). The stem assembly controls the amount and temperature of the water dispensed through the tub spout or shower head. Remove it with a special bath socket wrench, which looks similar a spark plug wrench on steroids.
Slide the bathroom socket onto the stem bonnet and turn it counterclockwise to break the stem loose. If it sticks, soak it with penetrating lubricant. Unscrew and remove the stem.
Stride five
Employ a seat wrench

Leaks commonly occur for two reasons. Over time, the seat washer stiffens and won't seal tightly. And h2o force per unit area gradually erodes the brass rim of the seat. Replace the seat using a special seat wrench.
Press the seat wrench firmly into the centre of the seat. Plow counterclockwise to snap the seat loose and remove it. If information technology sticks, soak information technology with penetrating lubricant. Coat the threads of the new seat with pipe dope and screw it into the fixture trunk with the seat wrench.
Step 6
Supercede the faucet stem parts

Figure A: Bathtub faucet parts names, faucet stem get together and replacement parts
Fig. A shows the bathtub plumbing faucet stem replacement parts and how to prepare the stalk for reinstallation. Lubricate the parts with special plumber'southward grease. If you're working on a two-handled faucet, we recommend replacing the washers and seats in both the hot and common cold valves.
- First, unscrew the packing nut. Twist the stem clockwise and back it out of the bonnet. Pry out the old packing washer with a small apartment-blade screwdriver or pick. Grease the stem threads and reinstall the stalk in the bonnet. Grease the new packing washer and slide it in place, and then grease the packing nut threads and firmly tighten the packing nut. Use special plumber'south grease.
- 2nd, remove the erstwhile seat washer screw and the old seat washer. Grease the new seat washer and the threads of the new screw and then reinstall them.
- Tertiary, pull off the quondam bonnet washer, grease the new one and slide it in place.
- Fourth, utilise pipe articulation compound to the bonnet threads and reinstall information technology in the faucet trunk (Step 4).
- 5, grease the handle splines and replace the escutcheon and handle.
Lamentable to flare-up your bubble, but you demand to cease believing these x plumbing myths ASAP!
Originally Published: November nineteen, 2022

How To Repair Shower Handles,
Source: https://www.familyhandyman.com/project/how-to-repair-a-leaking-tub-faucet/
Posted by: johnsonnatitiong.blogspot.com
0 Response to "How To Repair Shower Handles"
Post a Comment